Wednesday, January 30, 2013

It's the Small Things

Saturday marks our one year wedding anniversary, so I decided to take a minute to reflect on my first year as a mom.  In a nutshell, I love being a mom.  I especially love that I am a mom to Kylee.  I've said this before, but I truly mean it - I couldn't have been luckier.  Kylee is so mild-mannered and so sweet, and is typically only grumpy when she's really tired.  I love her.  And what makes me even happier is that she loves me.

I love the picture at the top of this post.  Let me explain.  We usually like to take off our shoes when we come into the house.  I have a giant "shoe pile" in the laundry room (we walk through the laundry room to get into the main part of the house when we come in through the garage).  Matt usually leaves one or two pair of shoes in the entry way.  Yesterday, when Kylee and I came home for the day, she took off her boots and placed them right next to her dad's church shoes in the entry way.  I don't know why, but I thought this was super sweet.  She sure loves her daddy.

Here are some things about Kylee that I wanted to record.  It's the small things that make me love being a mom.

  • Kylee loves breakfast, especially oatmeal and Cinnamon Toast Crunch.  She is going through a phase right now where she tells us she doesn't like the food before she even tries it.  We, of course, make her try what we've made for dinner, and she almost always loves it after she tries it.  She really likes fish (I think it's easier to eat than other meats) and brussel sprouts and meatballs.
  • Kylee's body parts "talk" to her.  For example: "My brain is telling me that it's not tired." or "My stomach is telling me that it is hungry."  
  • Kylee likes to wear her church clothes all day on Sunday... unlike Matt and I who change the second we walk in the door!
  • Kylee loves to have her back tickled.
  • Kylee loves when we read her bedtime stories.  Right now she's really enjoying the "pigeon books" that her grandma and grandpa gave her for Christmas.
  • Speaking of bedtime, right now Kylee is going through an "I'm scared" phase at bed (after lamp time and hall light time are over).   She has a night light in her room, but she doesn't seem to think that's enough light.  The problem is if I leave the lights in the hall on, it takes her forever to fall asleep.  I know that being afraid of the dark is normal, but I sure hope this phase ends soon!

Friday, January 25, 2013

Paint and More Trim Work

Matt and I headed over to our house this evening because we heard the painters would be finishing up next week.  We were thrilled with the progress this week!
I LOVE the wainscoting in the dining room.  LOVE!!!
The blue-gray color we picked out for the master suite.  I think it will look beautiful with our dark furniture and white bedding.
Not even half of my pantry :-)
Start of the mud room

Wednesday, January 23, 2013

"Trimming" the House

It's amazing how fast our trim work is moving along.  We have shelves in the closets, baseboards, window sills, and door frames.  The wainscoting will be going up anytime!


Tuesday, January 22, 2013

A Magical 13.1

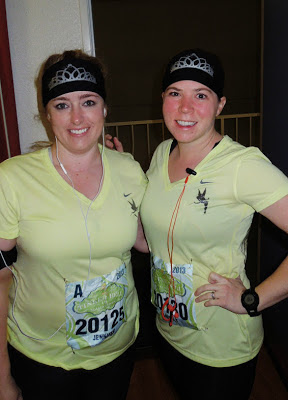
About a year ago, Jen started talking about the Tinkerbell Half Marathon in Disneyland and somehow convinced me that we should run the race.  Last June, we got registered and booked a motel room (good old Motel 6!), then in October we bought our plane tickets.  It was hard to believe that the weekend was finally here as we flew to Anaheim Friday morning, exchanging single digit temperatures for upper 70s and looking forward to a couple days of fun before the race.

Jen and I checked into our room Friday afternoon.  Not bad for a $65/night Motel 6 in Anaheim, right?  We had free shuttles to and from the parks because we were there for the race.
We decided to hit California Adventure Friday since I had never been, and we had a blast.  My favorites were Radiator Springs Racers, Toy Story Mania, and California Screamin.  The lines weren't too bad, especially since we took advantage of the Single Rider lines whenever we could.  We did all the rides we wanted to, watched It's a Bug's Life and the World of Color, and even stopped by the Mad Tea Party before we headed back to the motel at 9:30 pm.


Saturday was spent in Disneyland (Splash Mountain was my favorite!) and checking out the race expo.  I had my first Dole Whip (delicious) and we ate dinner at the Blue Bayou, overlooking the Pirates of the Caribbean ride.


Sunday morning was the race.  I wondered how I would do after walking around the parks for the two days prior!  We got up just after 3:00 am in time to catch a 3:30 am shuttle to the park.  We needed to be there by 4:00 and in our race corrals by 4:30 for the 5:00 am race start.  So early!  I was amazed how I was able to jump out of bed though and quickly get ready.

About 12,000 people ran the half marathon that morning, including Jen and I (the Sneaker Bells) and Brooke and Merrilee (the Boise Beauties).  We ran through California Adventure and Disneyland and through the streets of Anaheim.  I was glad I felt pretty good throughout the race, especially considering I trained by only running once a week.  I started getting tired around mile 9, but I pushed through and ran the entire way.  I could tell I slowed down a bit at the end, but I finished with a 2:17:55 time (although my watch showed that the race was actually 13.3 miles and that I finished 13.1 in 2:16!),

Overall, I had a great trip.  I did feel guilty several times being in Disneyland without Matt and Kylee, so I doubt I'll do the race again, but it was probably the most "magical" half marathon I could have run!

Kylee's Latest

Kylee has started adding "teeth" to her drawings of us.

Monday, January 21, 2013

Show Night

Last Monday was Show Night at The Little Gym.  I am so glad I decided to skip my workout so I could watch Kylee show off her gymnastics skills.  As they announced Kylee's name and I watched her run out onto the floor and do a forward roll, I got a little choked up.  It's amazing to me how much love I have in my heart for Kylee.  I am so proud/blessed/lucky to call her my daughter.  I couldn't have been happier doing anything else that night.  I was exactly where I was supposed to be.

Two thumbs up
Smile!
Awards Ceremony
Here's a short video from the evening.  Enjoy!

Thursday, January 17, 2013

Like Mother Like Daughter

Sometimes you would think Kylee is biologically mine.  Like a couple nights ago, for example... I typically pick out Kylee's clothes the night before so she can easily get dressed in the morning.  On Tuesday night, Kylee informed me she wanted to pick out her own clothes.  She dug through her drawer to find exactly what she wanted to wear, and then proceeded to meticulously lay out her clothes... complete with the panties underneath the leggings and the socks in the shoes.  I asked Kylee if she wanted to wear her boots instead because they would keep her warmer, but she insisted on the brown shoes saying "I never wear them."

I did the same thing when I was younger, although typically when I was excited for my first day of school outfit.  I love my sweet girl.

Wednesday, January 16, 2013

Giving Couponing a Try

I know that couponing has been the rage for several years now, but it just hasn't been my thing.  It seems like so much work to look through and clip coupons, and then remember to bring them to the store when you go.  And I was always under the impression that there aren't many things I buy that can use a coupon, since I mostly buy fresh foods (produce, dairy, meat).  Well, I've started subscribing to the blog Fabulessly Frugal in my Google Reader, and they do a lot of the legwork for you.  And I am realizing that I can save money on things I regularly buy, and not just stock up on things I don't need.

One of the things on Fabulessly Frugal that I like is they tell you when something is a really good deal (stock up price) by putting a red star next to it (I am awful at knowing what is a good deal).  So this last weekend, on my way home from the gym, I stopped by Target and used a printable coupon for $2 off four Dial hand soaps.  Target had reduced the price on their hand soaps to $1.16 each, so I snagged these for .73 each (after tax).

I still don't know that I'll go to five different stores just to get the best deals, at least not at this point in my life, but I am super excited about this deal on Chobani... Fred Meyer has a coupon for Chobani (my favorite yogurt) that brings the price to .80 each.  Tack on this coupon from the Chobani website and you can get them for as low as .50 each!!!  That's an amazing price.  I think they are usually $1.60 each at Albertsons (or something like that).  I will definitely head to Fred Meyer for this deal!

Tuesday, January 15, 2013

Gourmet Salad

I love a "sweet" salad, so it's no wonder why I loved the salad my mom asked me to make for Christmas Eve dinner.  I made it again this week, and loved it just the same, so thought I would share the recipe here.

10 – 12 cups mixed greens
½ pound white button mushrooms, sliced
2 ripe pears, thinly sliced
Fresh raspberries
¼ cup thinly sliced Parmesan cheese
1 lg carrot, thinly sliced
5 – 7 slices bacon, cooked and coarsely chopped
¼ - ½ cup thinly sliced red onion
Sliced almonds, candied

Dressing:
1/3 cup Pomegranate vinegar
3/4 cups sugar
2 T red onions, finely grated
1 T Dijon mustard
1 tsp salt
Pepper to taste
1 cups canola or olive oil

Directions:
For the salad – put mixed greens in a large salad bowl, top with other ingredients and toss. Serve with dressing.

For the dressing – Add all ingredients except oil in blender. Blend well. While processing, slowly add the oil and blend well. It keeps well in the frig for 1 – 2 weeks.

Monday, January 14, 2013

House Update {Doors}

I was so excited to drive by last week and see that we have garage doors!

And these were sitting inside the garage.  Love the 5-panel door style we picked out.

Tomorrow is our walk through with the finish carpenter.  Things are moving along!

Sunday, January 13, 2013

Spiritual Enlightenment: Be Happy!

Sorry for the post overload today... but I was just touched by the talks in sacrament meeting today that I felt one more post was in order.  There were three talks - repentance, forgiveness, and being happy.  I enjoyed every one of them.  I felt kind of grouchy this last week, so a lot of what was said hit close to home.  The last speaker shared a list of ways to help us be happy.  I didn't grab a pen (crayon) and paper fast enough to get them all, but here were a few of the suggestions... or at least the gist of them!
  1. Live a simpler life and think constructively.
  2. Try to see the other person's point of view.
  3. Rule your mood.
  4. Give generously.
  5. Be interested in others.
  6. Live one day at a time.
  7. Keep close to God.
I would much rather be happy than unhappy!  I pledge to find the happiness in every day.  I will work hard to not "make a mountain out of every little offending molehill of word or deed" (President Hinkley).  I will do my best to forgive quickly and repent often.

Speaking of being happy... I sure love these two.  This is an old pic (from August 2011!), but I love it anyway.

Kitchen Gadgetry

As I've started thinking about our move, I've been trying to get rid of things I haven't used in a while (or ever used)... I thought I'd share in this post a few things we won't be getting rid of - five of my favorite kitchen gadgets.  I have used all of these within the last 24 hours, and I love, love, LOVE them!
  • The Pampered Chef Mix 'N Chop.  I love how this handy tool helps crumble hamburger or sausage meat as it cooks.  I remember the days before I had this tool and I always ended up with giant chunks of hamburger... not anymore!
  • The Zyliss Food Chopper.  There are tons of different food choppers out there.  I'm sure I would love any one of them.  This just happens to be the one I have because 9 years ago I found it in the clearance bin at Albertsons for $4.99 (or something like that).  Makes chopping/dicing anything a cinch.
  • The Pampered Chef Measure, Mix & Pour.  The perfect container for homemade salad dressing.  I hate trying to mix and then ladle salad dressing out of a plastic container.  This mixes and pours  vinaigrettes perfectly, so no more separated oil and vinegar.
  • The Evriholder Egg Separator.  I purchased this egg separator at Sur La Table several years ago and I love it.  So much cleaner than separating eggs with the egg shell.  You might remember seeing this once before when I talked about how I ate an egg-white omelet :-)
  • The Capresso froth PRO Automatic Milk Frother.  This milk frother makes the perfect hot chocolate or steamed milk.  It mixes and froths and heats all at the same time.  By pushing the heat button on the front of the frother, hot chocolate is heated to the perfect temperature.

What kitchen gadgets do you love???

Blog Makeover {Custom Background}

There are free blog backgrounds all over the web, but kind of like my custom header, I wanted something simple and clean to reflect the "look" I wanted on my blog.  I wanted to make a soft, subtle, linen looking background, and found this site that had exactly what I was looking for.  Well, almost exactly.  Once again, it seems like almost all the tutorials I found were for Photoshop, and since I wanted to use Paint.net, I simply fumbled around, using the Elixir Graphics tutorial as a guide.

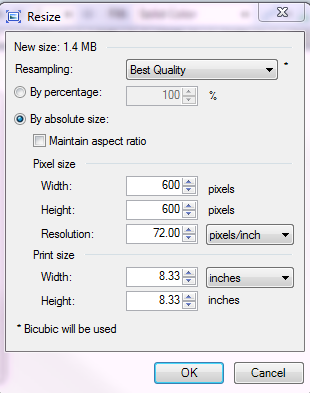
I first created a new Paint.net image, and resized my image (Image > Resize) to 600x600 pixels and a resolution of 72 pixels per inch.
Next, I added two more layers (Layers > Add New Layer), and renamed my new layers "Horizontal" and "Vertical".  I then selected a base color for my background, selected the fill tool, and made all three layers a solid gray.

Now it's time to add the cross hatch pattern.  Starting on the Horizontal layer, add Noise (Effects > Noise > Add Noise).  On the Horizontal layer, I did an Intensity of 65, with Color Saturation and Coverage set to 100.  I did the same settings on the Vertical layer, except did an Intensity of 70.
Next I changed my Opacity to 30 (32 for the Vertical layer) and Blending Mode to Multiply on the Horizontal and Vertical layers by double clicking on the layer in the Layers tool box.

It's finally time to add the cross hatch.  This is done by adding a Motion Blur (Effects > Blurs > Motion Blur) to the Horizontal and Vertical layers.  For the Horizontal layer, the Angle should be set to 0.  For the Vertical layer, the Angle should be set to 90.
And there you have it!  You can play around with the Background Color and the Opacity on the layers to adjust how much cross hatch you can see, but I kept mine low because I wanted a subtle linen look.  Once you have it how you want it, save it as a .jpg and upload it as your Background Image!

Saturday, January 12, 2013

Gun Withdrawals

I feel bad for Matt.  He sold one of his guns a few months ago with the intention of getting a new one by the end of the year (same type of gun, just a different brand that was endorsed by Ada County).  Now the guns have doubled in price, and he can't even order the one he wants (with the law enforcement seal) because they are completely gone.  There isn't even a waiting list.  He is sad.

We went to the gun show this afternoon and Matt had fun browsing, but didn't find anything to buy.  Hopefully in a few months things will calm down again, prices will drop back close to where they were, and Matt will stop going through withdrawals!

Blog Makeover {Related Posts}

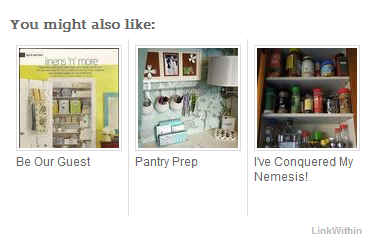
I had seen on other blogs a "related posts" section at the bottom of each post.  I think this helps if you're looking for something in particular, so I did a little research and found Link Within.  Their site has instructions on how to install the widget, but I did get a little confused, so maybe this will help you.

After you've entered your email, blog address, and selected your blog platform, you'll be taken to a page with a link to install your widget.  After clicking on the "Install Widget" link, you'll get a page that looks like this:
Clicking on the "Add Widget" button didn't do anything for me (I tried it multiple times in three different browsers!)  What I finally ended up doing was expand the "Edit Content", copy the code, and paste the code into a new HTML/Java Script gadget.  That did the trick!

Friday, January 11, 2013

Blog Makeover {Pinterest Widget}

Instead of adding a social media icon to link to my pinterest page, I decided to add a pinterest widget.  So pretty, and you can see my most recent pins.  I followed directions I found on Code it Pretty to add the pinterest supported widget to my right sidebar.

Thursday, January 10, 2013

Less Than Two Months!

We have passed the two month mark!  I'm starting to collect boxes (if you have any boxes you would like to donate to the cause, we'll take them!) and will start packing this weekend some of the things that we won't need between now and the date we close.

My mom asked Matt a couple weeks ago if he was as excited about our house as I was.  I answered that yes, he was pretty excited too.  He agreed, that he was excited, but probably not as excited as me.  He said, "I don't go around introducing myself... Hi, my name's Matt, and we're building a house."  Oh... so true! (Head in hands)

In any case, I figured it was time for some udpates!  Here are pictures from this week.  The walls are textured and the front of the house is getting closer.  We have a walk through next week with the finish carpenter.

Blog Makeover {Adding a Favicon}

What's a favicon, you ask?  Favicon is short for Favorite Icon and is the small picture next to your URL in the address bar or next to your blog name on the browser tab.

I used this tutorial at Her New Leaf as a guide, and created my favicon in Paint.net with an image size of 128x128 pixels.  I just created a simple H, and then uploaded it to Picasa Web Albums.
I then loaded my favicon in blogger following these instructions on Blogger in Draft.  Super simple to do (one of my simplest blog changes), and makes me feel cool.

Wednesday, January 9, 2013

Blog Makeover {Social Media Icons}

Before my mini blog makeover, I had a link list on the side of my blog with links to each of my social media pages... facebook, pinterest, goodreads, etc.  I decided, why use links when I can use a cute icon?

I found these free social media icons that at Carrie Loves Design.  She has them in all colors.  I decided to download them in Emerald.
Once I had downloaded these icons, I uploaded them to my Picasa Web Album as a place to host the images.  There are tons of sites that tell you how to add social media icons to your blog, such as this post on Blogging with Kids.

I added a facebook icon, a YouTube icon, and an RSS feed icon (a post on what I did with pinterest is coming soon!)  I really wanted a goodreads icon, but there wasn't one in the set.  So I made one!  Carrie included a blank icon in her download set, so I opened it up in Paint.net, found a font that resembled the goodreads icon, added a big white "g" in the middle of the icon, and then loaded my new icon to my Picasa Web Album.  Perfect!  No more social media sites in my link list!

Tuesday, January 8, 2013

Blog Makeover {Post Signatures}

I think it's fun when I see that people have "signed" their posts, and I decided I wanted to add a signature to my posts!

First, I needed to create a "signature".  I did this using Paint.net.  I started by creating a new image, and then resizing to 100 pixels high and 250 pixels wide.  After clicking on the Text tool, I selected my color, my font (MA Sexy), and my font size.  I then clicked in the Background layer and typed my name!

I then cropped my image close and saved it as a PNG.  After that, I needed somewhere online to "host" my picture, so I loaded my signature into my Picasa Web Album.  From there, I followed the directions on Code it Pretty so that my signature is automatically added to the end of all my posts, including previous posts I've done.  The cool part about that code?  I can change my signature whenever I want and it will update on all my posts!

Monday, January 7, 2013

Blog Makeover {Pages}

I've always loved the "tabbed" look of some of the WordPress templates, and just realized that Blogger also delivers this type of functionality - using Pages!  Not sure where I've been since this looks like it's been around for a while, but I decided to finally take advantage of it.  I wanted to clean up my sidebar since it seemed kind of "messy" to me, and Pages was the perfect way to do this.

There are instructions on Google Support for how to add stand alone pages (which can appear as tabs across the top of your blog), so I won't go into detail on how to add those, but I will share a couple other handy tips I found to format my tabs the way I wanted them.
  • Select a font for your tab text.  First, you need to select Customize from your template page.
  • Next, under Advanced, click Tabs Text and select the desired font, color, and background.

Once I had all my tabs added, they seemed a little "scrunched" on the left of the page.  I wanted the tabs to take up the entire width of my page.  I found this little snippet of code that I was able to add to my CSS to change my tab width.  I played around with the padding until the tabs worked with my blog layout.